作者: 引线小白-本文永久链接:httpss://www.limoncc.com/post/360dc16c61c8a0a9/
知识共享许可协议: 本博客采用署名-非商业-禁止演绎4.0国际许可证
摘要: 本文意在理清ggfu的原理和使用。若有错误,请大家指正。
关键词:gguf,大模型,模型量化
一、导言
开发者 Georgi Gerganov 基于 Llama 模型手撸的纯 C/C++ 版本,它最大的优势是可以在 CPU上快速地进行推理而不需要 GPU。然后作者将该项目中模型量化的部分提取出来做成了一个用于机器学习张量库:GGML,项目名称中的GG其实就是作者的名字首字母。它与其他张量库最大的不同,就是支持量化模型在CPU中执行推断。从而实现了低资源部署LLM,也就是大家常说的大模型民主化。而它生成的文件格式只存储了张量,为了适应发展提出了gguf格式标准,除了张量,还能存储分词器等其他模型信息。
目前这一格式标准得到了hugging face的支持。你应该容易发现hugging face仓库中经常能看到gguf后缀的文件。
下面通过一个简单例子回顾一下python二进制文件读写的知识,以方便深入理解gguf格式标准。
1 | # 1、准备文件和数据 |
二、设计一个二进制文件标准
上面是一个简单的例子,但是面临的数据类型是多种多样的,python为我们提供了struct库,它可以将Python对象转换为二进制格式并反之。这个模块提供了一种简单、快速和灵活的方法来处理结构化数据。下面我们来设计一个简单键值对二进制数据格式:键值对 = 长度+键+长度+值,然后不断堆叠。解码二进制的时候我们需要对值做一些约定即可。下面展示一个自己设计的例子:

二进制文件格式设计
按照这一格式设计,生成二进制文件的代码如下
1 | import os |
有这样一套标准信息,我们就很容易读取这个文件
1 | # 然后我们读取这个二进制文件 |
读取第二部分,对于list我们需要知道长度这样,才能方便读取。我们目前的设计没有考虑,注意这段代码中的3i,是c语言中的类型,见表:
1 | value = struct.unpack('3i', bin_file.read(value_len)) |
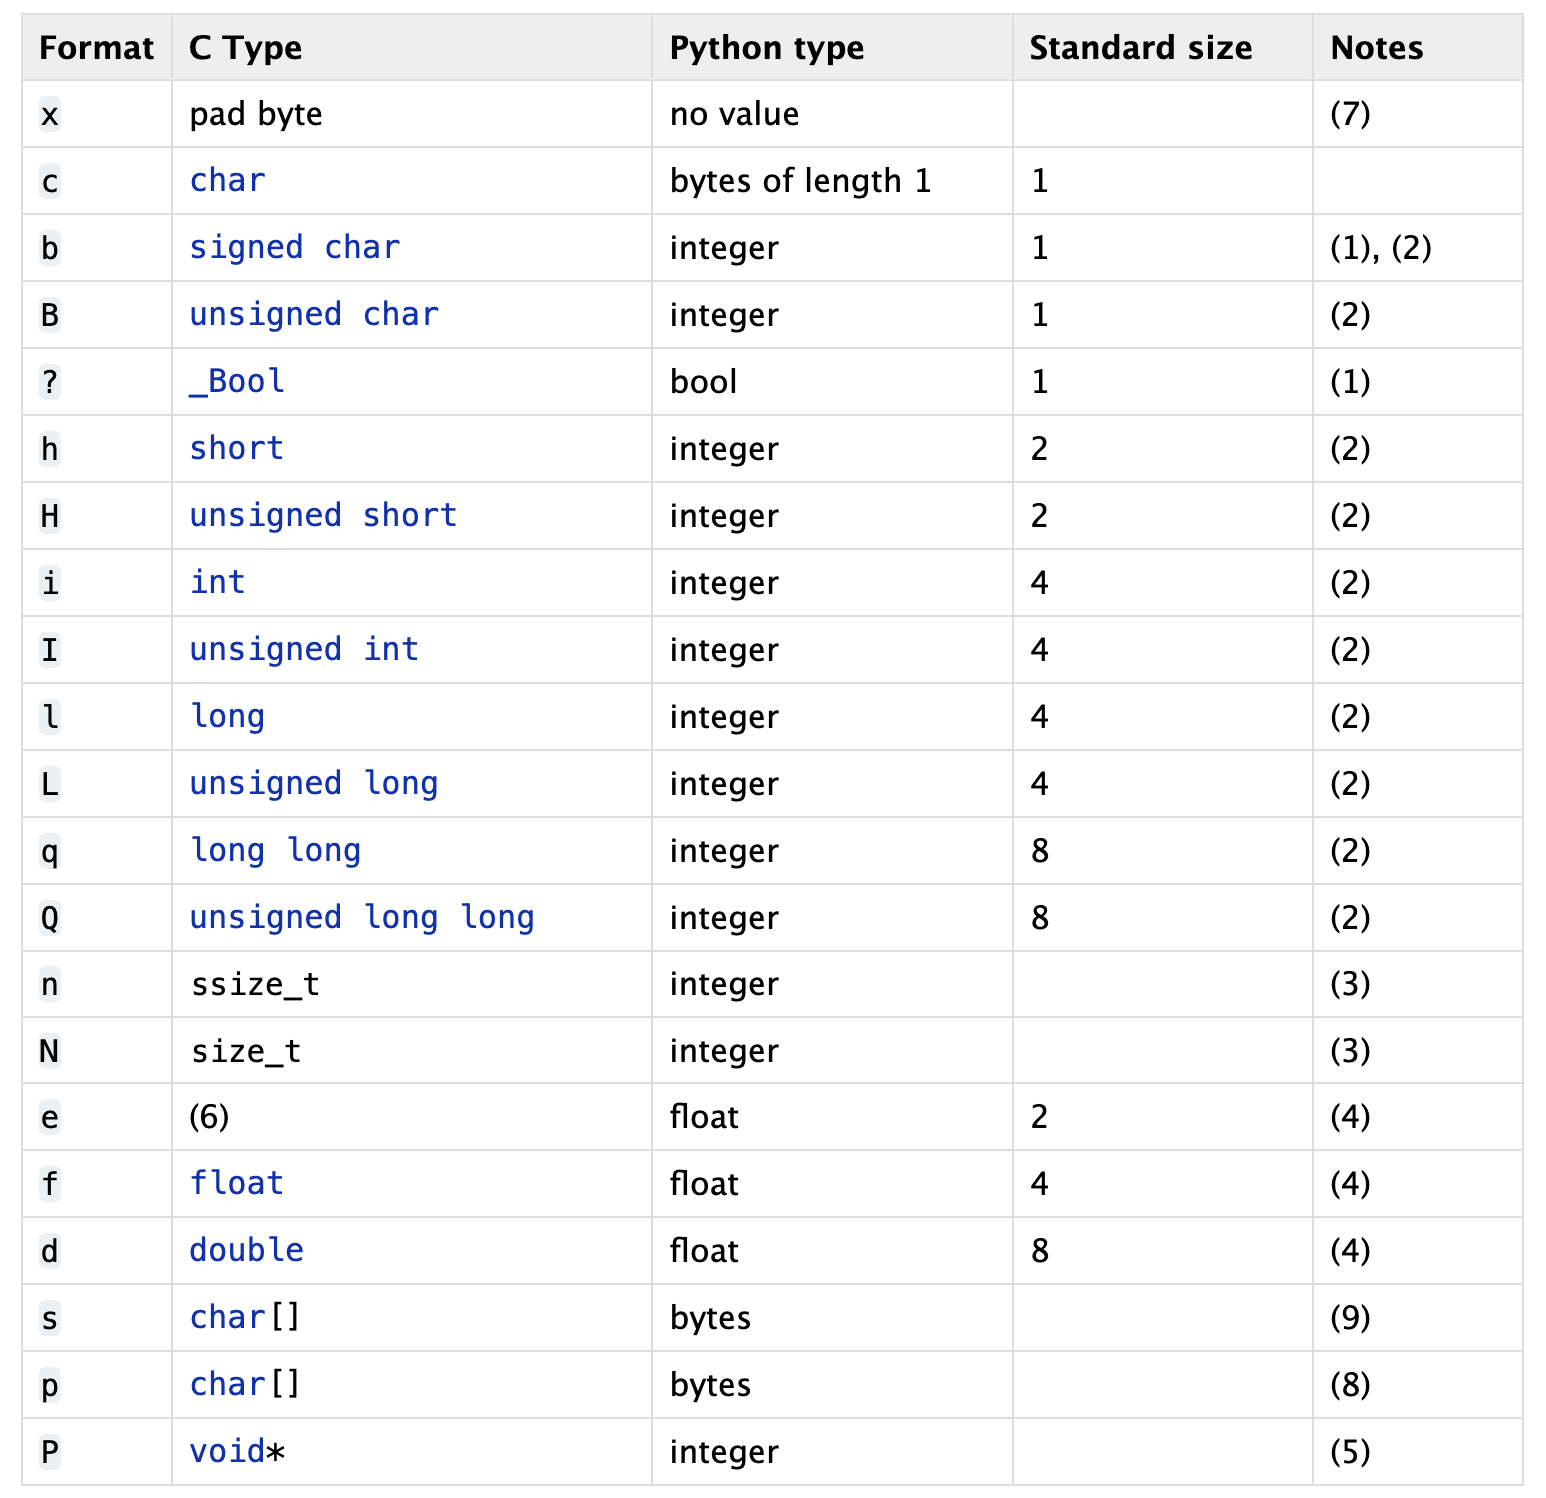
c语言类型
1 | # 我们先读取前缀,然后读取内容 |
最后我们做个总结,所谓二进制文件格式设计就是对内容的长度、数据类型、键值对的设计和一套默认规范。有了这套默认规范,这样就方便跨语言分享了。从而降低对框架的依赖。
三、揭开gguf的面纱
3.1、如何生成gguf文件
下面揭开gguf的面纱,实际上gguf也是这样差不多的规范。我们从一个简单例子开始
1 | import numpy as np |
然后我们解析它,给个图,可能更加清晰
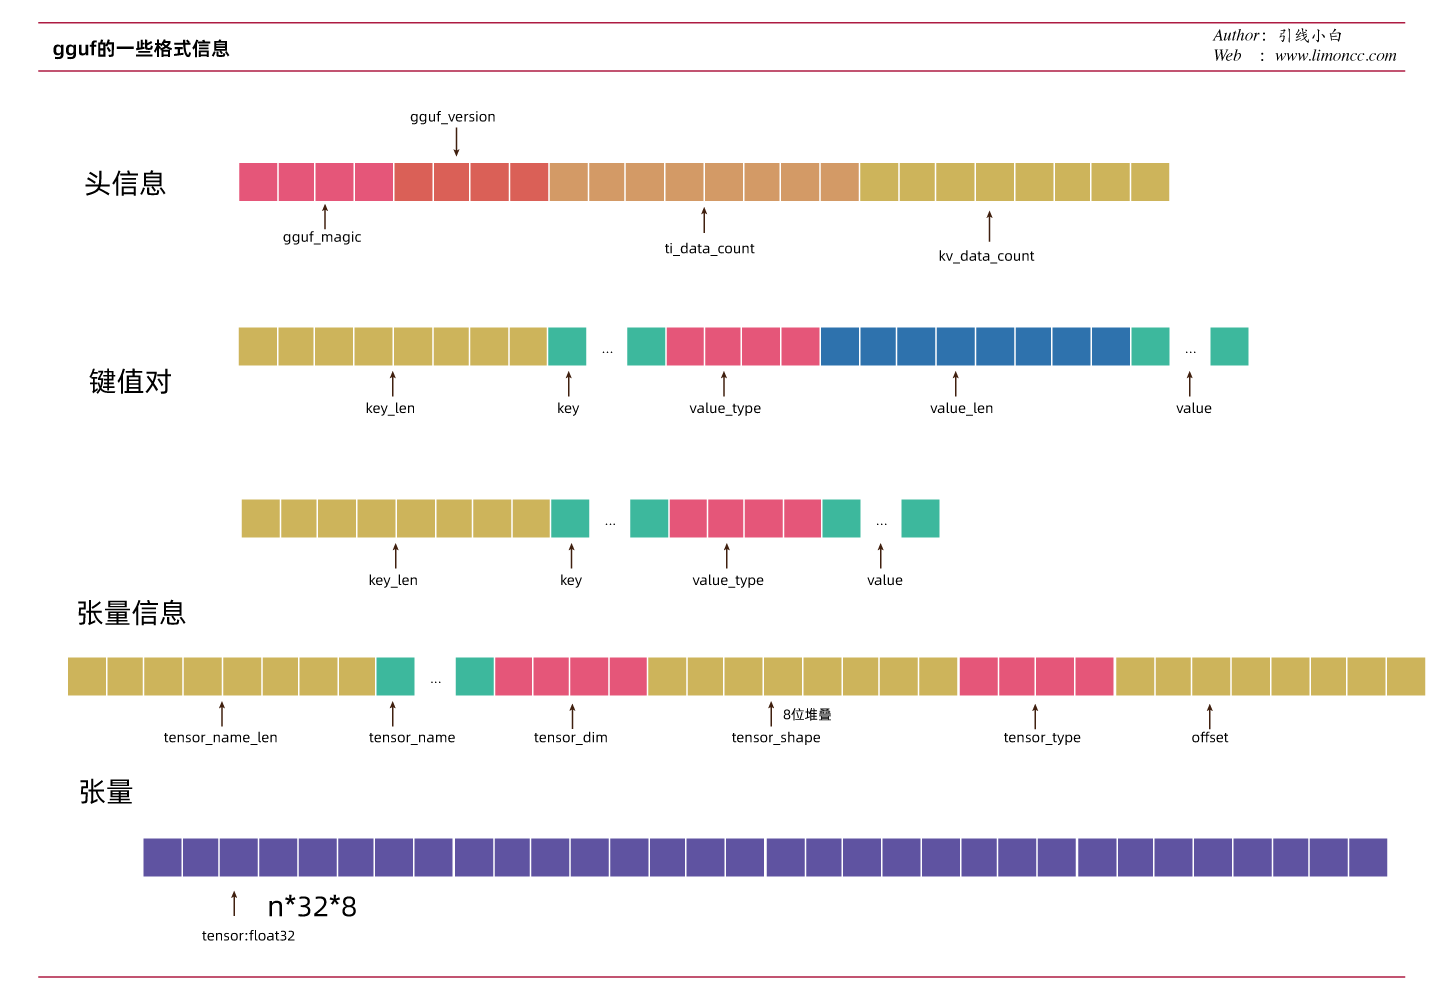
gguf文件格式
是不是非常简单。gguf按照自己的规范封装了一python库。这就是我们常见的在llama.cpp中的convert.py系列文件用到的一个核心库。
3.2、gguf标准键值对
general
- general.architecture: string
- general.quantization_version: uint32
- general.alignment: uint32
- general.name: string
- general.author: string
- general.description: string
- general.license: string
- general.file_type: uint32
- general.source.url: string
- general.source.huggingface.repository: string
llm
- [llm].context_length: uint64
- [llm].embedding_length: uint64
- [llm].block_count: uint64
- [llm].feed_forward_length: uint64
- [llm].use_parallel_residual: bool
- [llm].tensor_data_layout: string
attention
- [llm].attention.head_count: uint64
- [llm].attention.head_count_kv: uint64
- [llm].attention.max_alibi_bias: float32
- [llm].attention.clamp_kqv: float32
- [llm].attention.layer_norm_epsilon: float32
- [llm].attention.layer_norm_rms_epsilon: float32
- [llm].rope.dimension_count: uint64
- [llm].rope.freq_base: float32
- [llm].rope.scale_linear: float32
model
- [model].context_length
- [model].embedding_length
- [model].block_count
- [model]..feed_forward_length
- [model]..rope.dimension_count
- [model]..attention.head_count
- [model]..attention.layer_norm_rms_epsilon
- [model].rope.scale
- [model]..attention.head_count_kv
- [model]..tensor_data_layout
tokenizer
- tokenizer.ggml.model: string
- tokenizer.ggml.tokens: array[string]
- tokenizer.ggml.scores: array[float32]
- tokenizer.ggml.token_type: array[uint32]
- tokenizer.ggml.merges: array[string]
- tokenizer.ggml.added_tokens: array[string]
- tokenizer.ggml.bos_token_id: uint32
- tokenizer.ggml.eos_token_id: uint32
- tokenizer.ggml.unknown_token_id: uint32
- tokenizer.ggml.separator_token_id: uint32
- tokenizer.ggml.padding_token_id: uint32
- tokenizer.huggingface.json: string
3.3、如何读取gguf文件
读取头信息,为什么总有一个<的符号?这个符号的作用主要是为了按照指定格式对齐长度
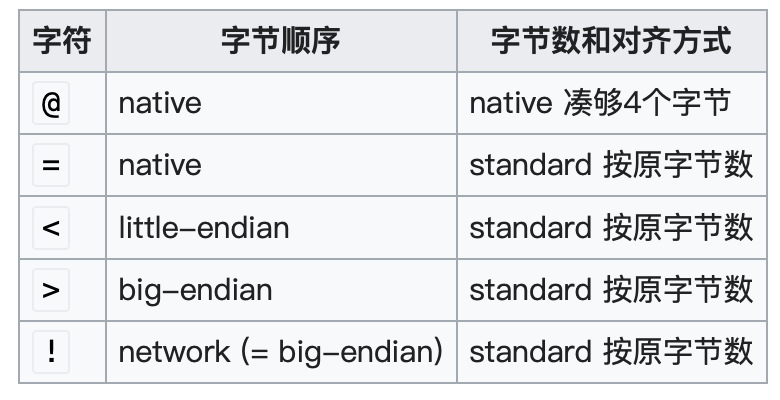
对齐
1 | import os |
结果
1 | gguf_magic:b'GGUF' |
1 | # 取第一个kv信息 |
1 | general.architecture:test |
注意当我们开始写入张量信息的时候,gguf标准会对前面的二进制信息作补全操作,就是会加零。这样方便我们读取张量信息。
1 | # 获取当前二进制文件位置 |
结果:1
2(100.0, 100.0, 100.0, 100.0, 100.0, 100.0, 100.0, 100.0, 100.0, 100.0, 100.0, 100.0, 100.0, 100.0, 100.0, 100.0, 100.0, 100.0, 100.0, 100.0, 100.0, 100.0, 100.0, 100.0, 100.0, 100.0, 100.0, 100.0, 100.0, 100.0, 100.0, 100.0, 100.0, 100.0, 100.0, 100.0, 100.0, 100.0, 100.0, 100.0, 100.0, 100.0, 100.0, 100.0, 100.0, 100.0, 100.0, 100.0, 100.0, 100.0, 100.0, 100.0, 100.0, 100.0, 100.0, 100.0, 100.0, 100.0, 100.0, 100.0, 100.0, 100.0, 100.0, 100.0, 100.0, 100.0, 100.0, 100.0, 100.0, 100.0, 100.0, 100.0, 100.0, 100.0, 100.0, 100.0, 100.0, 100.0, 100.0, 100.0, 100.0, 100.0, 100.0, 100.0, 100.0, 100.0, 100.0, 100.0, 100.0, 100.0, 100.0, 100.0, 100.0, 100.0, 100.0, 100.0, 100.0, 100.0, 100.0, 100.0, 100.0, 100.0, 100.0, 100.0, 100.0, 100.0, 100.0, 100.0, 100.0, 100.0, 100.0, 100.0, 100.0, 100.0, 100.0, 100.0, 100.0, 100.0, 100.0, 100.0, 100.0, 100.0, 100.0, 100.0, 100.0, 100.0, 100.0, 100.0, 100.0, 100.0, 100.0, 100.0, 100.0, 100.0, 100.0, 100.0, 100.0, 100.0, 100.0, 100.0, 100.0, 100.0, 100.0, 100.0, 100.0, 100.0, 100.0, 100.0, 100.0, 100.0, 100.0, 100.0, 100.0, 100.0, 100.0, 100.0, 100.0, 100.0, 100.0, 100.0, 100.0, 100.0, 100.0, 100.0, 100.0, 100.0, 100.0, 100.0, 100.0, 100.0, 100.0, 100.0, 100.0, 100.0, 100.0, 100.0, 100.0, 100.0, 100.0, 100.0, 100.0, 100.0, 100.0, 100.0, 100.0, 100.0, 100.0, 100.0, 100.0, 100.0, 100.0, 100.0, 100.0, 100.0, 100.0, 100.0, 100.0, 100.0, 100.0, 100.0, 100.0, 100.0, 100.0, 100.0, 100.0, 100.0, 100.0, 100.0, 100.0, 100.0, 100.0, 100.0, 100.0, 100.0, 100.0, 100.0, 100.0, 100.0, 100.0, 100.0, 100.0, 100.0, 100.0, 100.0, 100.0, 100.0, 100.0, 100.0, 100.0, 100.0, 100.0, 100.0, 100.0, 100.0, 100.0, 100.0, 100.0, 100.0, 100.0, 100.0, 100.0, 100.0, 100.0, 100.0, 100.0, 100.0, 100.0, 100.0, 100.0, 100.0, 100.0, 100.0, 100.0, 100.0, 100.0, 100.0)
(101.0, 101.0, 101.0, 101.0, 101.0, 101.0, 101.0, 101.0, 101.0, 101.0, 101.0, 101.0, 101.0, 101.0, 101.0, 101.0, 101.0, 101.0, 101.0, 101.0, 101.0, 101.0, 101.0, 101.0, 101.0, 101.0, 101.0, 101.0, 101.0, 101.0, 101.0, 101.0, 101.0, 101.0, 101.0, 101.0, 101.0, 101.0, 101.0, 101.0, 101.0, 101.0, 101.0, 101.0, 101.0, 101.0, 101.0, 101.0, 101.0, 101.0, 101.0, 101.0, 101.0, 101.0, 101.0, 101.0, 101.0, 101.0, 101.0, 101.0, 101.0, 101.0, 101.0, 101.0)
如果你对大模型应用有兴趣,欢迎加入AutogenQQ交流群:593623958
| 版权声明 |  |
| 由引线小白创作并维护的柠檬CC博客采用署名-非商业-禁止演绎4.0国际许可证。 本文首发于柠檬CC [ https://www.limoncc.com ] , 版权所有、侵权必究。 | |
| 本文永久链接 | httpss://www.limoncc.com/post/360dc16c61c8a0a9/ |
| 如果您需要引用本文,请参考: |
| 引线小白. (Oct. 24, 2023). 《gguf的原理和使用——大模型CPU部署系列02》[Blog post]. Retrieved from https://www.limoncc.com/post/360dc16c61c8a0a9 |
| @online{limoncc-360dc16c61c8a0a9, title={gguf的原理和使用——大模型CPU部署系列02}, author={引线小白}, year={2023}, month={Oct}, date={24}, url={\url{https://www.limoncc.com/post/360dc16c61c8a0a9}}, } |